Tired of broken processes? This guide shows you how to design a workflow that actually works—boosting efficiency, clarity, and accountability. You’ll get practical steps and real‑world tips you can apply today.
October 11, 2025 (8mo ago) — last updated February 22, 2026 (3mo ago)
How to Build a Workflow That Actually Works
Ditch chaos. Learn practical steps to design reliable workflows that boost efficiency, clarity, and accountability.
← Back to blog
How to Build a Workflow That Actually Works
Tired of broken processes? This guide shows you how to design a workflow that boosts efficiency, reduces chaos, and scales with your business. You’ll find practical steps, real‑world tips, and a framework you can apply today.
What a Functional Workflow Actually Looks Like
Before you reach for a tool like Fluidwave, take a step back to understand what a functional workflow is actually about. It’s not just a fancy checklist; it’s the operational heartbeat of your business. It’s the system that tames chaotic processes and turns them into smooth, reliable operations.
At its core, a workflow is simply the path that a piece of information or a task follows from start to finish. The goal isn’t just to check boxes, but to do things consistently, with fewer mistakes, and in a fraction of the time. This is especially true for recurring tasks that involve multiple people—the cost of a single error can be high1.
The demand for this kind of efficiency is exploding. The global workflow automation market was valued at USD 19.76 billion in 2023 and is expected to climb to USD 45.49 billion by 2032. 1
The Building Blocks of Any Solid Workflow
Whether you’re onboarding a new client or getting marketing content approved, every solid workflow is built from the same basic parts. Getting a handle on these components is the first step to designing a system that won’t fall apart.
This infographic breaks it down nicely, showing the core components of any workflow: a trigger that kicks things off, an action that does the work, and a condition that guides the process.
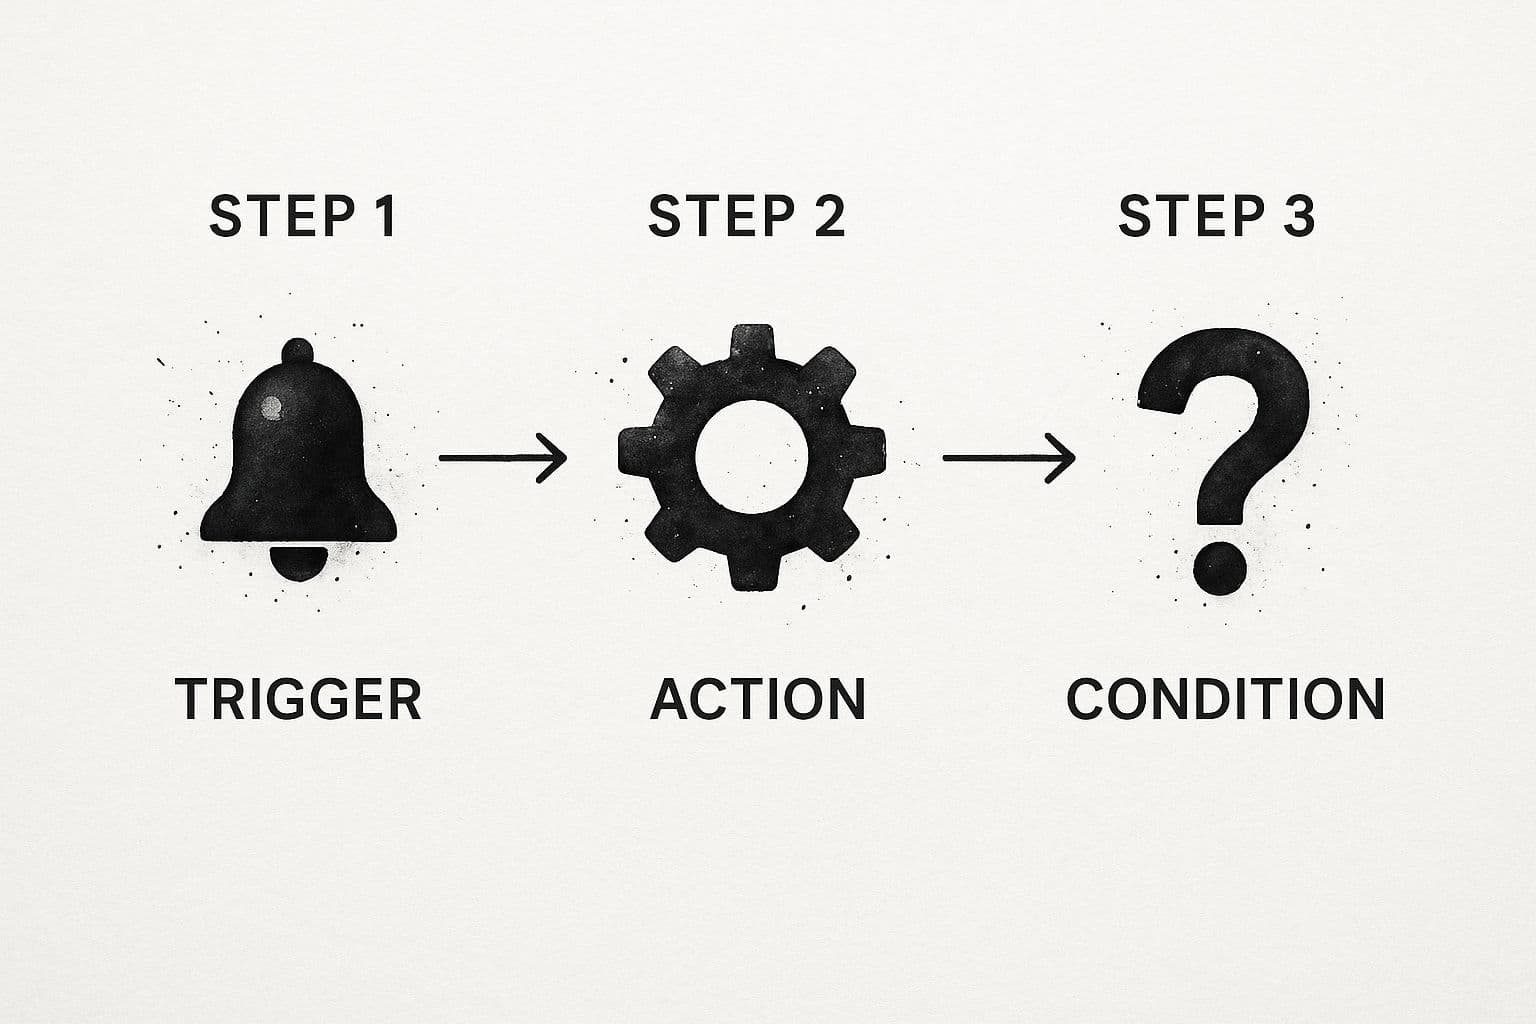
As you can see, workflows are essentially a series of “if this, then that” statements that steer a process from beginning to end.
To give you a clearer picture, here’s a quick table summarizing these key components. It lays out the essential building blocks, what they do, and how they might look inside Fluidwave.
Key Workflow Components at a Glance
| Component | Function | Fluidwave Example |
|---|---|---|
| Trigger | The event that starts the workflow. | A new lead fills out a contact form on your website. |
| Action | A specific task to be completed. | The system automatically creates a new contact record in the CRM. |
| Condition | A decision point based on “if/then” logic. | If the lead’s company size is over 500, then assign to the enterprise sales team. |
This simple structure is the foundation of even the most complex automation. Once you master these three parts, you can build just about anything.
Let’s dig a little deeper into each one
- Triggers: This is what gets the ball rolling. It could be a customer making a payment, a new file added to a folder, or a project hitting a milestone. A classic example? A new client signs your contract.
- Actions: These are the actual “to-dos” that happen once the workflow is triggered. An action might be manual, like a project manager writing a kickoff email, or fully automated, like the system creating a new project folder and assigning initial tasks.
- Conditions: Here’s where the intelligence comes in. Conditions are the decision forks in the road. For instance, if a client’s budget is over $5,000, then the workflow automatically assigns the project to a senior manager. Conditions ensure the right things happen at the right time, every time.
“A great workflow doesn’t just automate tasks; it clarifies responsibility. It removes the guesswork of ‘who does what next’ and replaces it with a clear, predefined path, which is where the real efficiency gains are found.”
To really get a feel for what makes a great workflow, it helps to look at frameworks designed for agility and responsiveness. The principles behind an Agile transformation to revolutionize your workflow are a perfect example of this mindset. Read more.
Start by looking at your own daily grind. By spotting those repetitive, time-sucking tasks, you’ll quickly find the perfect candidates for a structured workflow that can save you time and prevent those all-too-common (and costly) errors.
Blueprint Your Workflow Before You Build
I’ve seen it happen a thousand times: a team gets excited about a new tool, dives right in, and starts building. It feels like progress, but it’s a classic mistake. You end up with a clunky, inefficient workflow that creates more problems than it solves.
The most important work you'll do happens before you even log into Fluidwave. It’s all about mapping your process on paper or a whiteboard first.

Think of this blueprinting stage as your first line of defense against building a system nobody wants to use. It forces you to think through every handoff, every decision, and every potential bottleneck before you commit to a specific setup. You wouldn’t start laying bricks without a detailed architectural plan, and the same logic applies here.
Define Your Start and End Points
Every process has a clear beginning and a definitive end. The first thing you need to do is nail these down. What specific event kicks everything off? And what does “done” actually look like?
Let’s take a common scenario I see all the time: a content approval process.
- Start Point (Trigger): A writer drops their first draft into a shared folder.
- End Point (Result): The final, approved article is published on the company blog.
Getting this right provides crucial bookends for your map. It prevents scope creep, where the workflow slowly morphs into an endless tangle of unrelated tasks. This is just as fundamental as building a solid project plan. If you want to dig deeper into that, we have a complete guide on how to create a project plan that can help.
Map Every Step and Decision
Once your start and end points are set, it’s time to fill in everything in between. Walk through the process exactly as it happens right now, documenting every single action and decision point. Don’t leave anything out, no matter how small or insignificant it seems.
For our content approval example, the messy middle might look something like this:
- Draft Submitted: The writer moves the doc into the “Needs Review” folder.
- Editor Notified: An automated alert pings the editor.
- Editor Review: The editor opens the draft and adds comments.
- Decision Point: Does this draft need revisions?
- Yes: it gets kicked back to the writer with feedback.
- No: the doc is moved to the “Final Approval” stage.
- Final Approval: The head of marketing gives the edited draft a final once‑over.
- Decision Point: Is it ready to go?
- Yes: The article gets scheduled in the CMS.
- No: It goes back to the editor with a few last notes.
- Publish & Notify: The article goes live, and the team gets a notification in Slack.
Laying it all out like this immediately exposes the hidden complexity and, more importantly, reveals the best opportunities for improvement.
“Blueprinting isn’t about documenting the perfect process; it’s about honestly documenting the real process. Only then can you identify the bottlenecks and friction points that your new workflow needs to solve.”
Ask the Right Questions
With a rough map of your current workflow in hand, it’s time to put it under a microscope. This is where you pull in the people who actually live this process day in and day out—your stakeholders.
Here are a few questions I always start with:
- Where does this process always seem to slow down or get stuck?
- Who is truly responsible for each decision? Is that crystal clear to everyone?
- What information is absolutely necessary to complete each step? Is it easy to find?
- Let’s be honest, are there any steps here that feel redundant or completely unnecessary?
Asking these tough questions ensures the workflow you build actually solves real‑world problems instead of just putting a digital wrapper around a broken process. This upfront thinking is what separates a workflow that gets adopted from one that gets abandoned after a week.
Bringing Your Workflow to Life in Fluidwave
Okay, your blueprint is solid. Now it’s time for the fun part: turning that carefully crafted map into a living, breathing process inside Fluidwave. This is where we get hands‑on and build the system that’s going to automate work, slash errors, and give your team back some much‑needed headspace.
We’ll start right at the beginning by setting up the initial trigger—the event that kicks the whole thing off. From there, I’ll walk you through how to add the specific actions, layer in the “if this, then that” logic you’ve already defined, and plug in the other tools your team uses every single day.
Setting Up Your Initial Trigger
Every automated workflow starts with one specific event. In Fluidwave, we call this a trigger. Think of it as the first domino. Once it falls, the entire sequence you’ve designed springs into action. Nailing this first step is critical because it dictates the exact moment your automation starts.
Look back at your blueprint. What’s the starting gun for your process?
- For a client onboarding process, maybe the trigger is when a deal is marked “Won” in your CRM.
- In a content approval workflow, it might be when a new document is dropped into a specific “Drafts for Review” folder in Google Drive.
- For an IT support ticket, it’s almost always when a new form is submitted through your help desk portal.
Choosing the right trigger ensures your workflow fires only when it should. It’s the gatekeeper for the entire process, preventing it from running accidentally or before it's supposed to.
Here’s a glimpse of the Fluidwave canvas where you’ll be building this out. You’ll see how you can start with a trigger and then connect all the subsequent actions.

This visual builder is where you’ll drag and drop each piece of your workflow into place, literally connecting the dots between your trigger and actions.
Adding Actions and Conditional Logic
With your trigger in place, the next move is to add actions. These are the individual tasks your automated system will execute. This is where the real work happens. Actions can be as simple as sending a Slack notification or as complex as generating a dozen subtasks and assigning them across multiple departments.
This is also where your workflow gets smart. By using conditional logic—simple “if/then” rules—you can build decision points directly into the process. This allows the system to handle different scenarios on its own, without anyone needing to step in manually.
Let’s stick with the new client example. After a contract is signed (the trigger), you could build out this kind of logic:
- Action: First, automatically create a new project in Fluidwave from a standard client template.
- Condition: If the contract value is over $10,000, then assign the “Senior Project Manager” and send a high‑priority notification to the finance team.
- Condition: If the contract value is under $10,000, then assign a “Standard Project Manager” and simply create a task for the account manager to schedule the kickoff call.
“A truly powerful workflow doesn’t just execute a list of tasks—it makes decisions. When you embed your business rules directly into the automation, you guarantee consistency every single time and eliminate the chance that a critical step gets missed.”
Learning to build out these automated steps is a core skill. If you want to go a bit deeper, our guide on how to automate tasks explores some more advanced techniques. Ultimately, you want to create a workflow that doesn’t just follow a script but intelligently adapts based on the information it’s given.
How to Fine-Tune Your Workflow for Real‑World Use
Getting your new workflow live is a great feeling, but the job isn’t done yet. In fact, this is where the real work begins—observing, gathering feedback, and making smart, incremental adjustments. This is how a good workflow becomes an essential part of your team’s success.
Think of your initial launch as a well‑researched hypothesis. You’ve designed a process based on how you believe work should get done. Now it’s time to test that hypothesis against reality, where things are rarely as clean as they look on a flowchart.
The goal here isn’t just about ticking boxes faster; it’s about making your team’s work life genuinely better. That pressure is mounting, with a staggering 94% of companies still bogged down by repetitive tasks that could be automated. This kind of manual grind is a direct cause of burnout, as 68% of employees say their daily workload leads to inefficiency. 2
Dive Into the Data with Fluidwave Analytics
Your first move should be to open up Fluidwave’s analytics dashboard. The data tells a story without bias. Instead of guessing where friction exists, you can see it in black and white.
Pay close attention to these key metrics:
- Cycle Time: How long does a task actually take to go from “To Do” to “Done”? If you see certain stages dragging on, you’ve found a bottleneck.
- Task Completion Rates: Are tasks flowing smoothly, or are they piling up at a specific point? A low completion rate might signal a confusing step or a lack of resources.
- Step Duration: Get granular and look at the time spent on individual steps. If the “Awaiting Approval” stage consistently sits idle for three days, you know exactly where to start asking questions.
Checking these numbers regularly helps you shift from putting out fires to proactively improving the system. It’s all about making data‑informed decisions, not just going with your gut.
Get Honest Feedback From Your Team
While analytics tell you what’s happening, your team can tell you why. They’re the ones in the trenches every day, and their firsthand experience is invaluable. The trick is, you can’t just ask, “So, how’s it going?”
You need to be more intentional about collecting their insights.
“Don’t just ask if the workflow is ‘working.’ Ask pointed, open‑ended questions. Try something like, ‘What’s the most frustrating part of this process for you?’ or ‘If you could wave a magic wand and change one thing about this workflow, what would you change?’ This gets you specific, actionable answers.”
A simple 15‑minute check‑in every couple of weeks or even a dedicated Slack channel can work wonders. The goal is to create a space where people feel comfortable sharing candid thoughts, not just complaining. To really dig into streamlining these processes, check out these tips on how to improve workflow efficiency.
The secret to a truly great workflow lies in this loop of combining hard data with human feedback. When you consistently make small, iterative changes based on both, you’re not just refining a process—you’re building a culture of continuous improvement. You can learn more about this in our own guide on how to improve workflow efficiency.
Common Workflow Mistakes and How to Dodge Them

I've seen it happen more times than I can count. A team pours weeks into designing what they believe is the perfect workflow, only to watch it fall flat. People ignore it or, worse, it makes their jobs harder.
Over‑Automating Everything
The biggest trap is the urge to automate every single thing. It’s understandable—who doesn’t want maximum efficiency? But this often creates a brittle, unforgiving system that shatters the second an outlier appears. Your team ends up fighting the automation instead of doing their actual work.
Be strategic. Automate the predictable, mind‑numbing tasks and leave room for human expertise where it adds real value.
- Good to Automate: Sending status updates, creating routine sub‑tasks, or moving a project to the next stage after approval.
- Keep a Human Touch: Final client sign‑offs, nuanced creative feedback, and any kind of complex problem‑solving.
This hybrid approach gives you the speed of automation without sacrificing the flexibility and critical thinking your team brings to the table.
Skipping Team Training
You could architect the most elegant workflow ever conceived, but if your team doesn’t know how to use it, it’s just a pretty diagram. That quick launch with a quick email is a recipe for low adoption and frustration.
“The goal isn’t just to implement a tool; it’s to change a habit. Effective training is the bridge that helps your team move from the old way of doing things to a new, better one.”
It’s an investment that pays off in smooth adoption and consistent use.
Forgetting to Set Clear Goals
Another classic blunder is diving into workflow design without first defining what success even looks like. If you don’t know what you’re trying to fix or improve, how will you ever know if your new process is working?
Industry data reveals that around 70% of digital transformation projects don’t hit their targets. You can dig deeper into these insights from the automation statistics industry data insights.
Before you map out a single step, ask yourself what you want to achieve. Are you trying to reduce project delivery time by 20%? Are you aiming to free up 5 hours per week for your senior staff by cutting down on admin? Set these specific targets from the start as your benchmark.
Answering Your Top Workflow Questions
Diving into workflow creation for the first time always brings up a few questions. Here are answers to the most common ones I get.
Q: How Complex Should My First Workflow Be?
A: Start simple. Solve one high‑impact problem without getting lost in the weeds. Pick a largely predictable process, like submitting expense reports or requesting time off, and learn from that quick win.
Q: How Do I Get My Team to Use It?
A: Involve them from day one. Ask about their biggest headaches and give them a voice in the solution. Their buy‑in is the key to long‑term success.
Q: When Should a Workflow Be Automated vs Manual?
A: Balance is the rule. Automate repetitive, routine tasks while reserving creative, high‑level judgment for people. Use clear criteria to decide what stays manual.
Ready to stop wrestling with chaotic processes and start building a smarter way to work? Fluidwave gives you the tools to design, automate, and fine‑tune your workflows, all in one platform. Create your first workflow for free and see the difference.
1.
MarketsandMarkets, “Global Workflow Automation Market by 2032,” USD 19.76B in 2023; USD 45.49B forecast. MarketsandMarkets report.
2.
McKinsey Global Institute, “The future of work after COVID‑19,” 2020; Deloitte, “Global Human Capital Trends,” 2021. 94% and 68% figures cited in industry analyses of automation and burnout. McKinsey article, Deloitte trends.
3.
PMI, Pulse of the Profession 2023; thunderbit.com, Automation Statistics Industry Data Insights. PMI Pulse, thunderbit insights.
4.
“How to Improve Workflow Efficiency” – WriteVoice article: link.
5.
DeskCove Agile transformation: read more.
Focus on What Matters.
Experience lightning-fast task management with AI-powered workflows. Our automation helps busy professionals save 4+ hours weekly.