Master the 6 steps of the design process, from empathy to iteration. Get a practical breakdown with examples, checklists, and tips for building better products.
May 16, 2026 (1d ago)
The 6 Steps of the Design Process: A Practical Guide
Master the 6 steps of the design process, from empathy to iteration. Get a practical breakdown with examples, checklists, and tips for building better products.
← Back to blog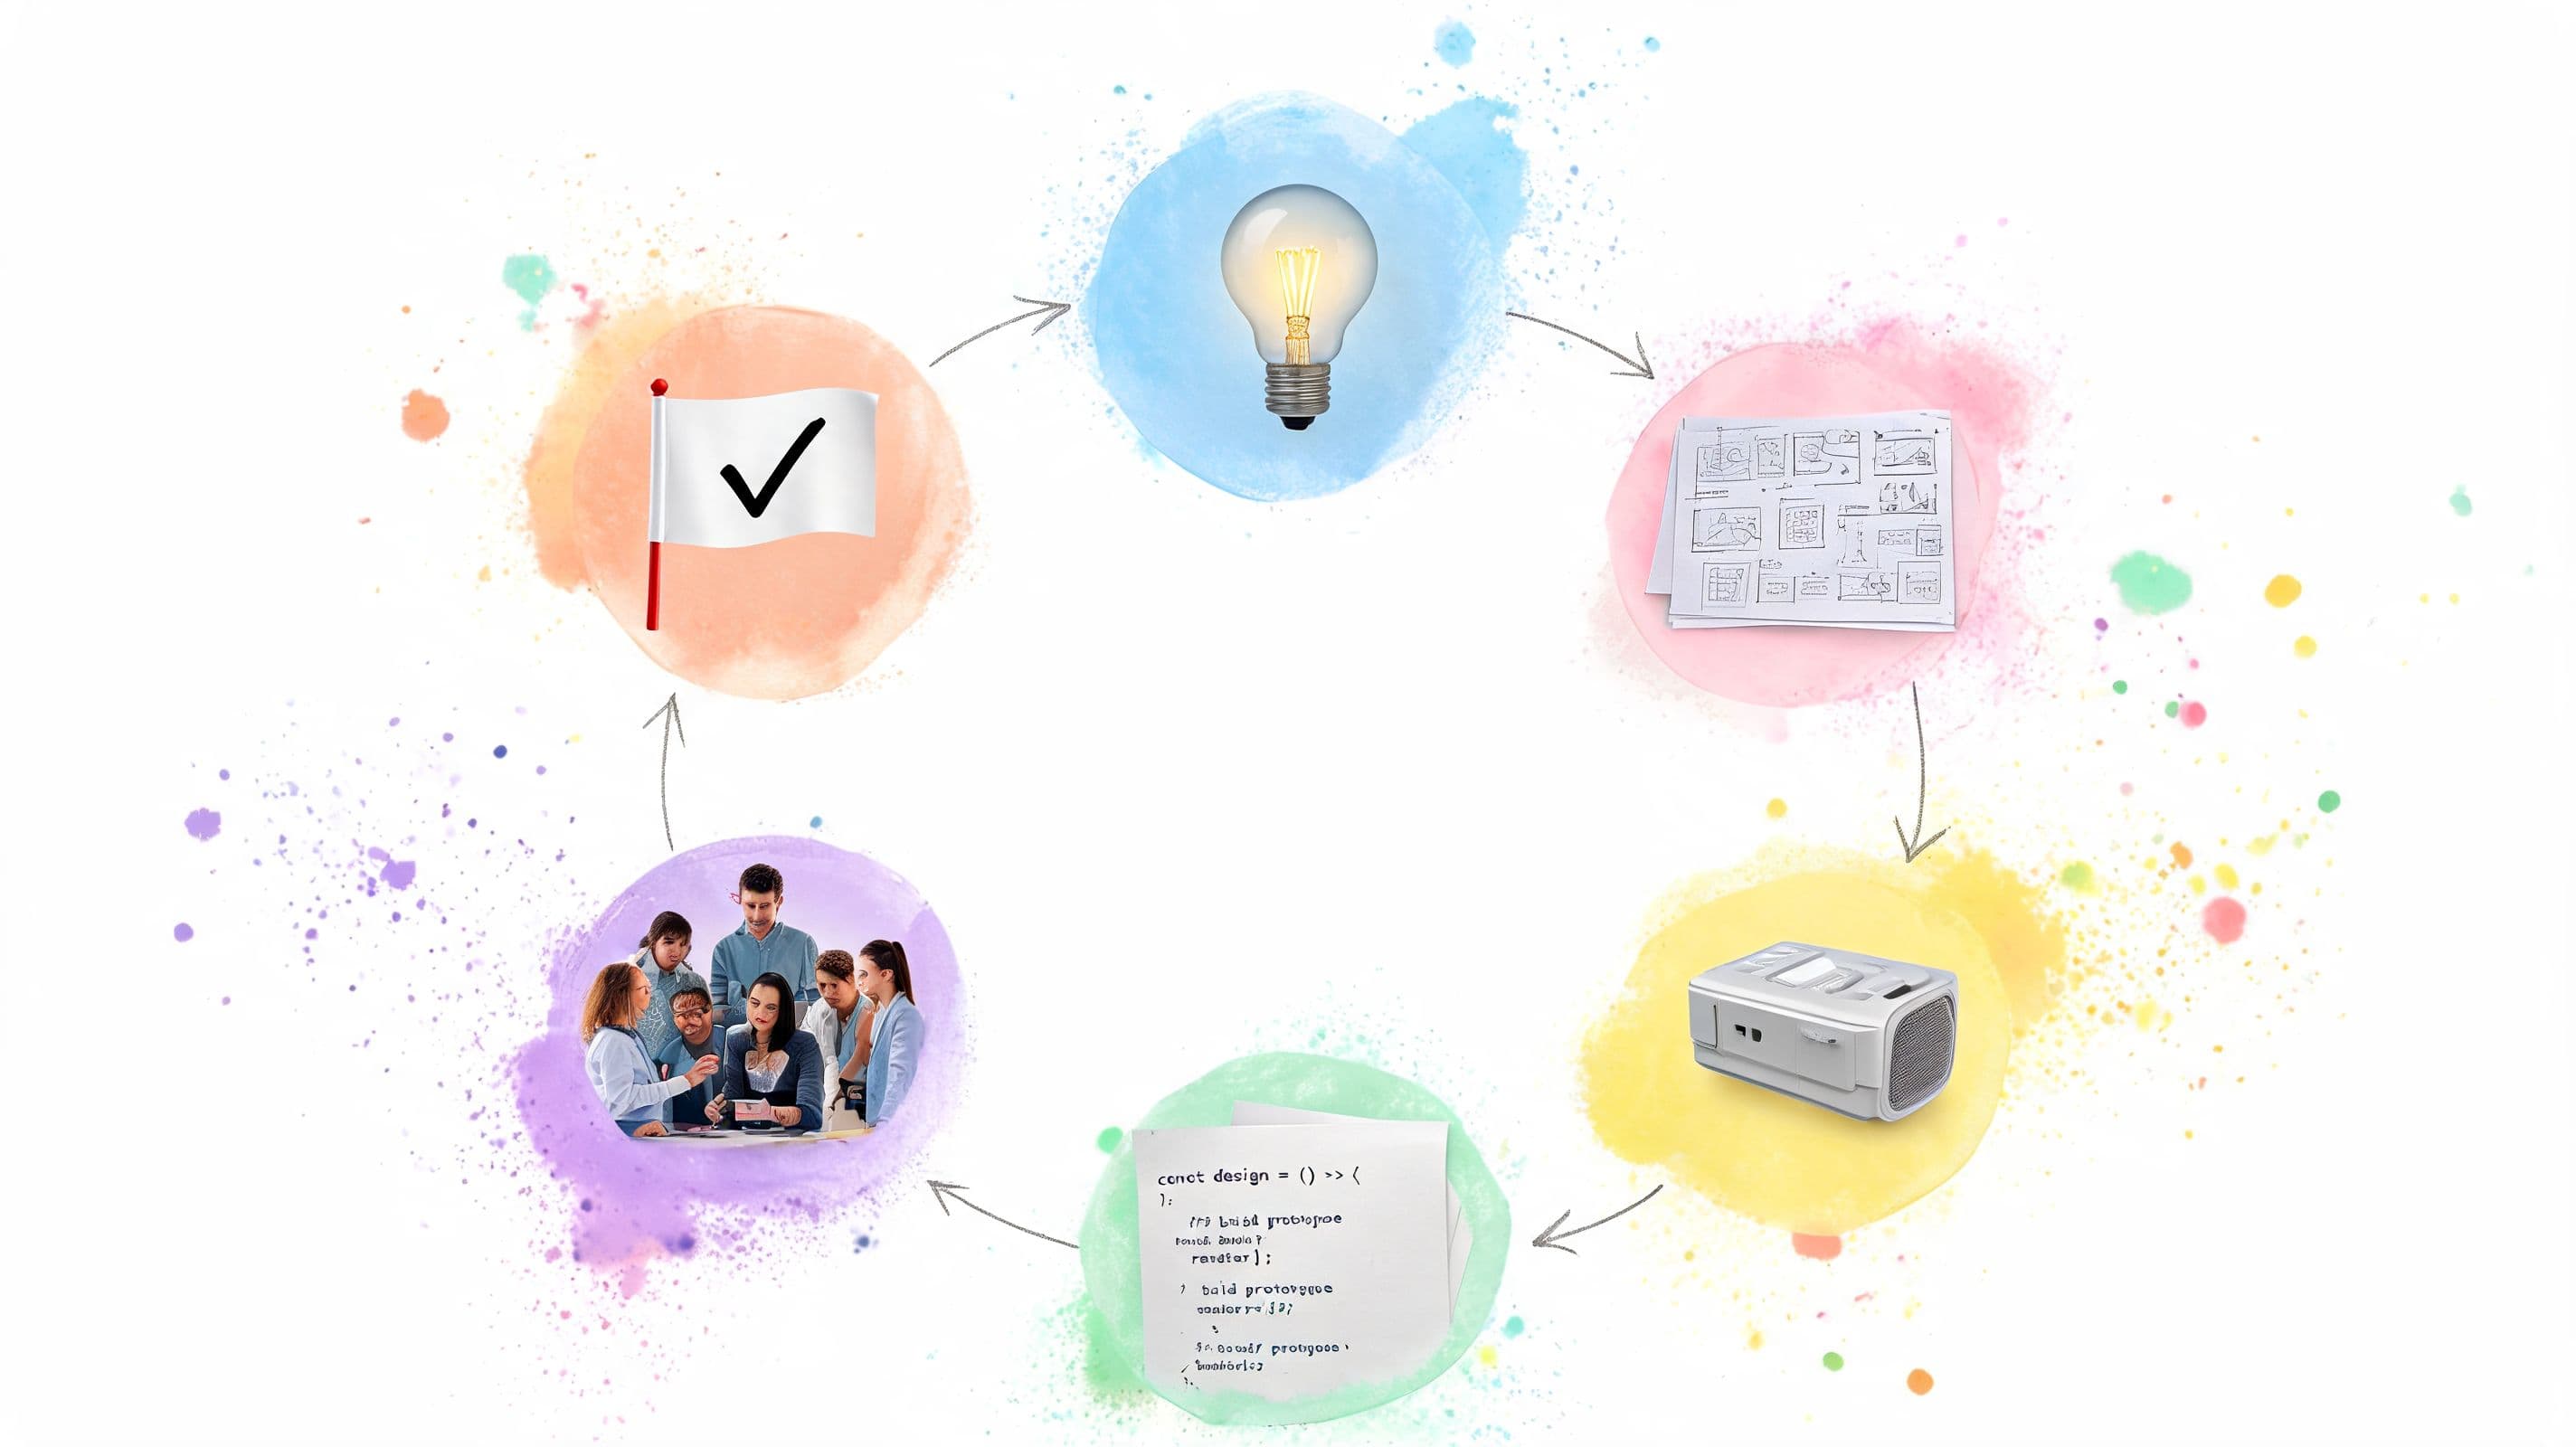
A product can miss even when the idea is good. The launch goes out, users hesitate, support tickets pile up, and the team starts debating features that should've been settled much earlier. Most of the time, that isn't a vision problem. It's a process problem.
The 6 steps of the design process help teams turn loose ideas into decisions they can execute. Used well, the framework isn't rigid. It's a working rhythm for learning what matters, testing what holds up, and keeping design, product, and engineering aligned before expensive implementation starts.
That matters because modern versions of the model consistently follow a six-part flow such as Empathize, Define, Ideate, Prototype, Test, and Implement or Iterate, and industry guidance treats it as a practical way to reduce risk before launch by validating assumptions with users first, as summarized in this overview of the historical six-step design process. In product work, that turns design from a creative exercise into a repeatable delivery system.
If you're managing a real roadmap, the challenge isn't just knowing the 6 steps of the design process. It's running them without losing momentum. That's where task management and delegation matter. A tool like Fluidwave can help teams turn each stage into assigned work, visible decisions, and follow-ups that don't disappear after the workshop ends.
1. Empathize - Understanding User Needs
It is common for teams to rush this step because they already have a solution in mind. That's exactly how they end up designing around internal assumptions instead of user behavior.
The empathize stage works when it stays close to lived reality. In practical product work, the strongest inputs are user interviews, surveys, analytics review, and competitive analysis because they help teams establish baseline behavior and reduce the risk of building the wrong workflow, as described in this guide to the six-step design workflow in UX and PM practice. For a task product, that means watching how people capture work, delay decisions, switch contexts, and hand tasks off to others.
A team building something like Fluidwave should study different patterns, not just one user type. Executives often want fast delegation and low-friction triage. Founders usually care about prioritization and keeping moving across many competing demands. Virtual assistants need clarity on task intake, deadlines, and expected output. Neurodivergent users may care less about feature breadth and more about cognitive load, visual clarity, and fewer decisions on screen.
What to capture during research
A lot of good research dies in messy notes. Put structure around it early.
- User goals: What the person is trying to get done, separate from the feature they ask for.
- Current workaround: Spreadsheets, sticky notes, Slack messages, calendar blocks, or personal rituals that already hold the workflow together.
- Failure moments: Where the system breaks, such as lost tasks, unclear ownership, or too many choices.
- Emotional signal: Stress, hesitation, distrust, or relief. Those often explain adoption better than feature requests.
Practical rule: Document what users say and what they do. The gap between those two is usually where the design opportunity sits.
This is also the point where operational discipline matters. Use Fluidwave or your project system to assign interviews, tag themes, and delegate transcript review so the research burden doesn't sit on one designer. If you need a strong reminder on listening before solutioning, Fluidwave's piece on listening to understand is worth sharing with the team.
For teams that need a broader menu of methods, Formbricks has a useful breakdown of ways to improve your product with research.
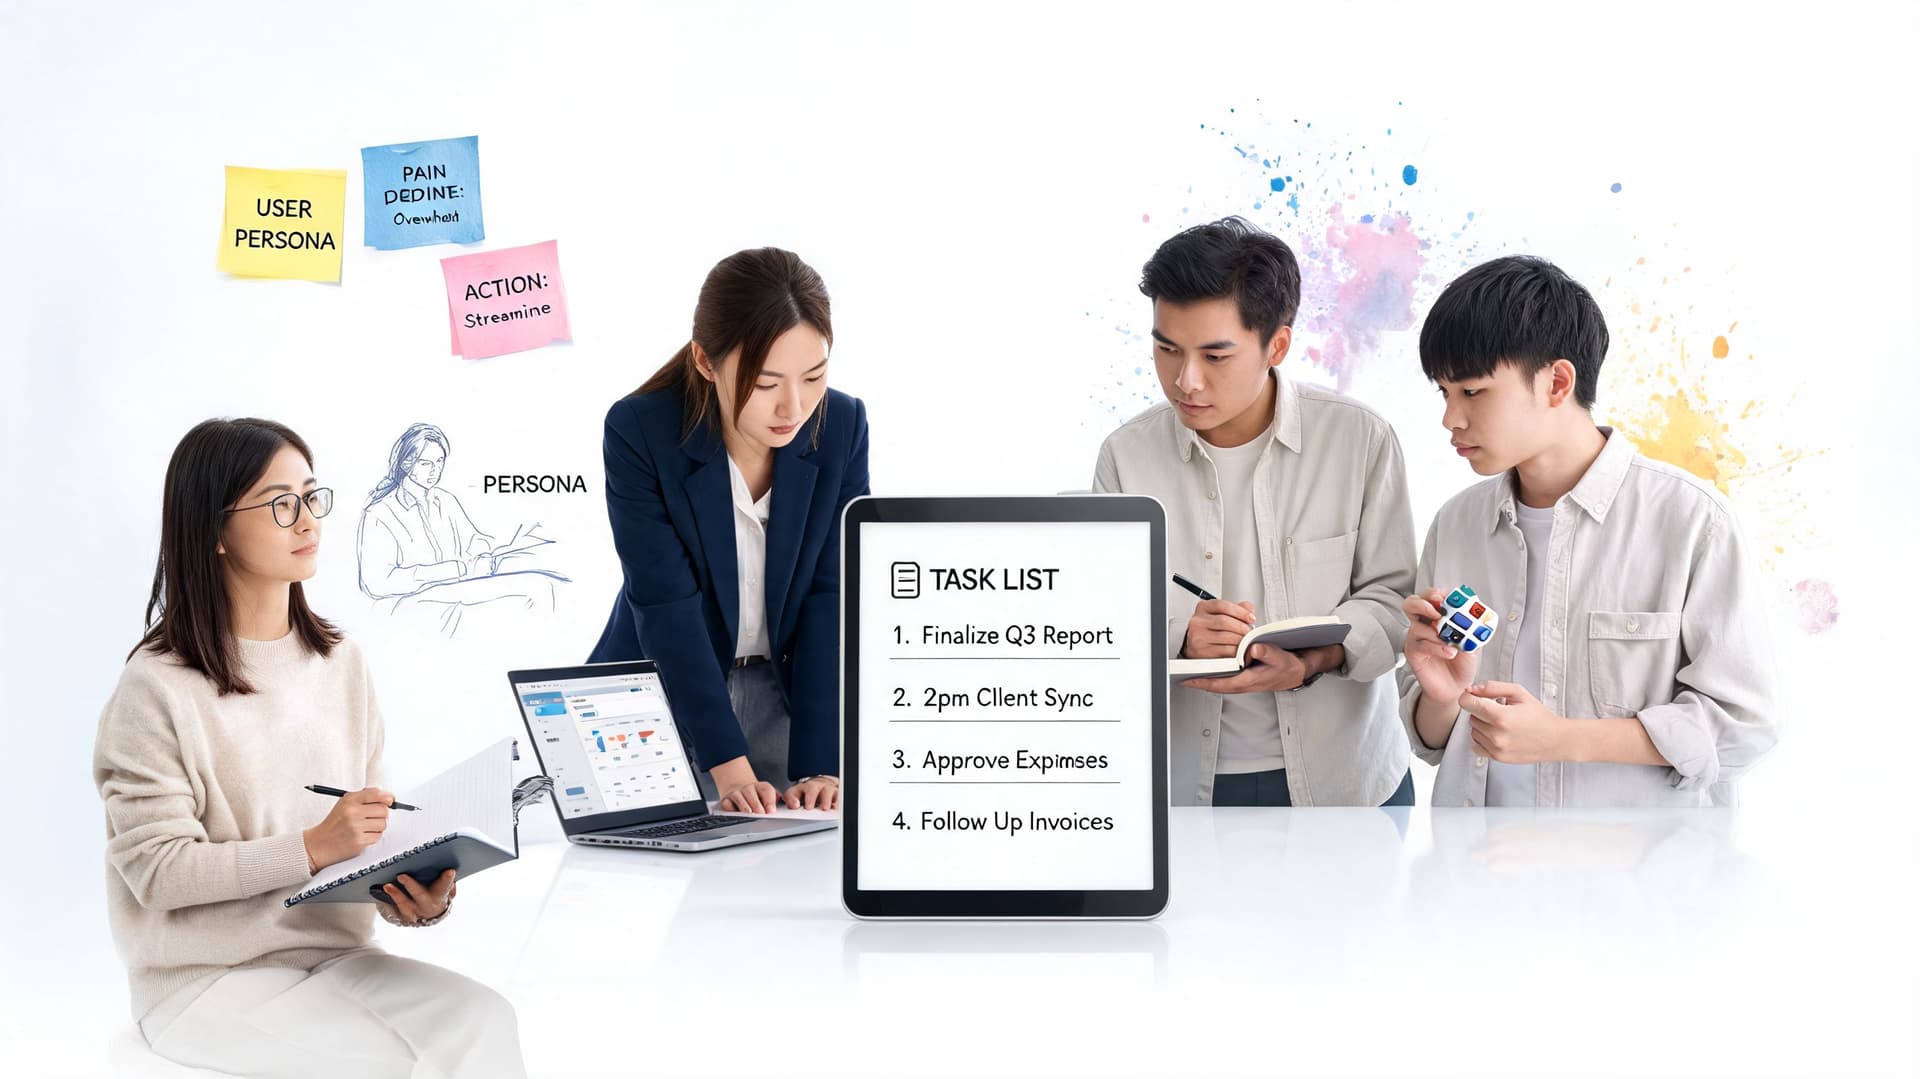
2. Define - Problem Statement & Design Brief
Raw research isn't direction. Teams need a sharp problem statement before they start generating solutions.
At this point, many projects drift off course. Someone says, "Users need a smarter dashboard," and everybody nods. But that isn't a problem statement. It's an implementation guess. In the define stage, you translate scattered observations into a decision-making brief the whole team can use.
A solid define phase turns behavior into constraints and measurable outcomes. Guidance on the six-step process emphasizes converting research into SMART goals and baseline metrics before solutioning so later prototype and test results can be compared against something concrete rather than opinion, as outlined earlier in the UX and PM framework.
What a good definition sounds like
Weak briefs talk about screens and features. Strong briefs talk about user friction and the condition for success.
For example, a task platform might define the problem this way: overwhelmed users can't tell what to do next, don't trust automation enough to delegate confidently, and lose focus when the interface asks them to make too many small decisions. That's something a team can design against.
You also need to separate hard constraints from preferences. Timeline, compliance requirements, data availability, and engineering realities are hard constraints. Stakeholder style opinions usually are not.

A good problem statement narrows the target without dictating the answer.
If scope keeps drifting, lock the brief into a written document and get explicit sign-off. That doesn't make the project inflexible. It keeps the team from re-litigating the same question every week. This is also where a clear scope of work helps because it defines what the team is committing to solve now versus later.
One practical tip: keep the number of core problems small. If your brief lists everything, it prioritizes nothing. In most product cycles, a few high-confidence problems will outperform a long list of loosely connected pain points.
3. Ideate - Generating Creative Solutions
Ideation isn't a contest to produce the cleverest concept in the room. It's a way to widen the option set before the team locks itself into the first reasonable answer.
This is the stage where teams should temporarily suspend the urge to judge. The define phase gives you the guardrails. Ideation lets you explore inside them. If users struggle with overload, maybe the answer is auto-prioritization. Maybe it's a calmer inbox. Maybe it's a stronger delegation flow. Maybe it's fewer views, not more.
That said, brainstorming without structure usually produces a pile of sticky notes no one uses. Set prompts that are specific enough to produce usable options.
Better prompts produce better concepts
A few examples that work in practice:
- Workflow prompt: How might a founder go from task dump to confident plan without sorting everything manually?
- Constraint prompt: How would we design this for someone who gets overwhelmed by dense interfaces?
- Trust prompt: What would make delegation feel safe enough to try the first time?
- Edge-case prompt: What happens when a user arrives late in the day with a backlog and no energy left?
Fluidwave is a helpful example here because the product naturally invites hybrid thinking. Instead of choosing between software-only automation and purely human support, a team can explore combinations of AI-assisted organization, manual override, and task delegation to virtual assistants. That's the kind of idea that usually shows up only when product, design, support, and operations are all in the room together.
One useful tension in ideation is breadth versus focus. Too much breadth and the team wanders. Too much focus and you just validate the first concept someone senior already wanted.
"Generate more options than you think you'll need, then cut harder than you want to."
I also like to break ideation into two rounds. First round is expansive and fast. Second round is selective and practical. That's where you ask which ideas directly answer the problem statement, which ones create downstream complexity, and which ones are promising enough to prototype rather than debate.
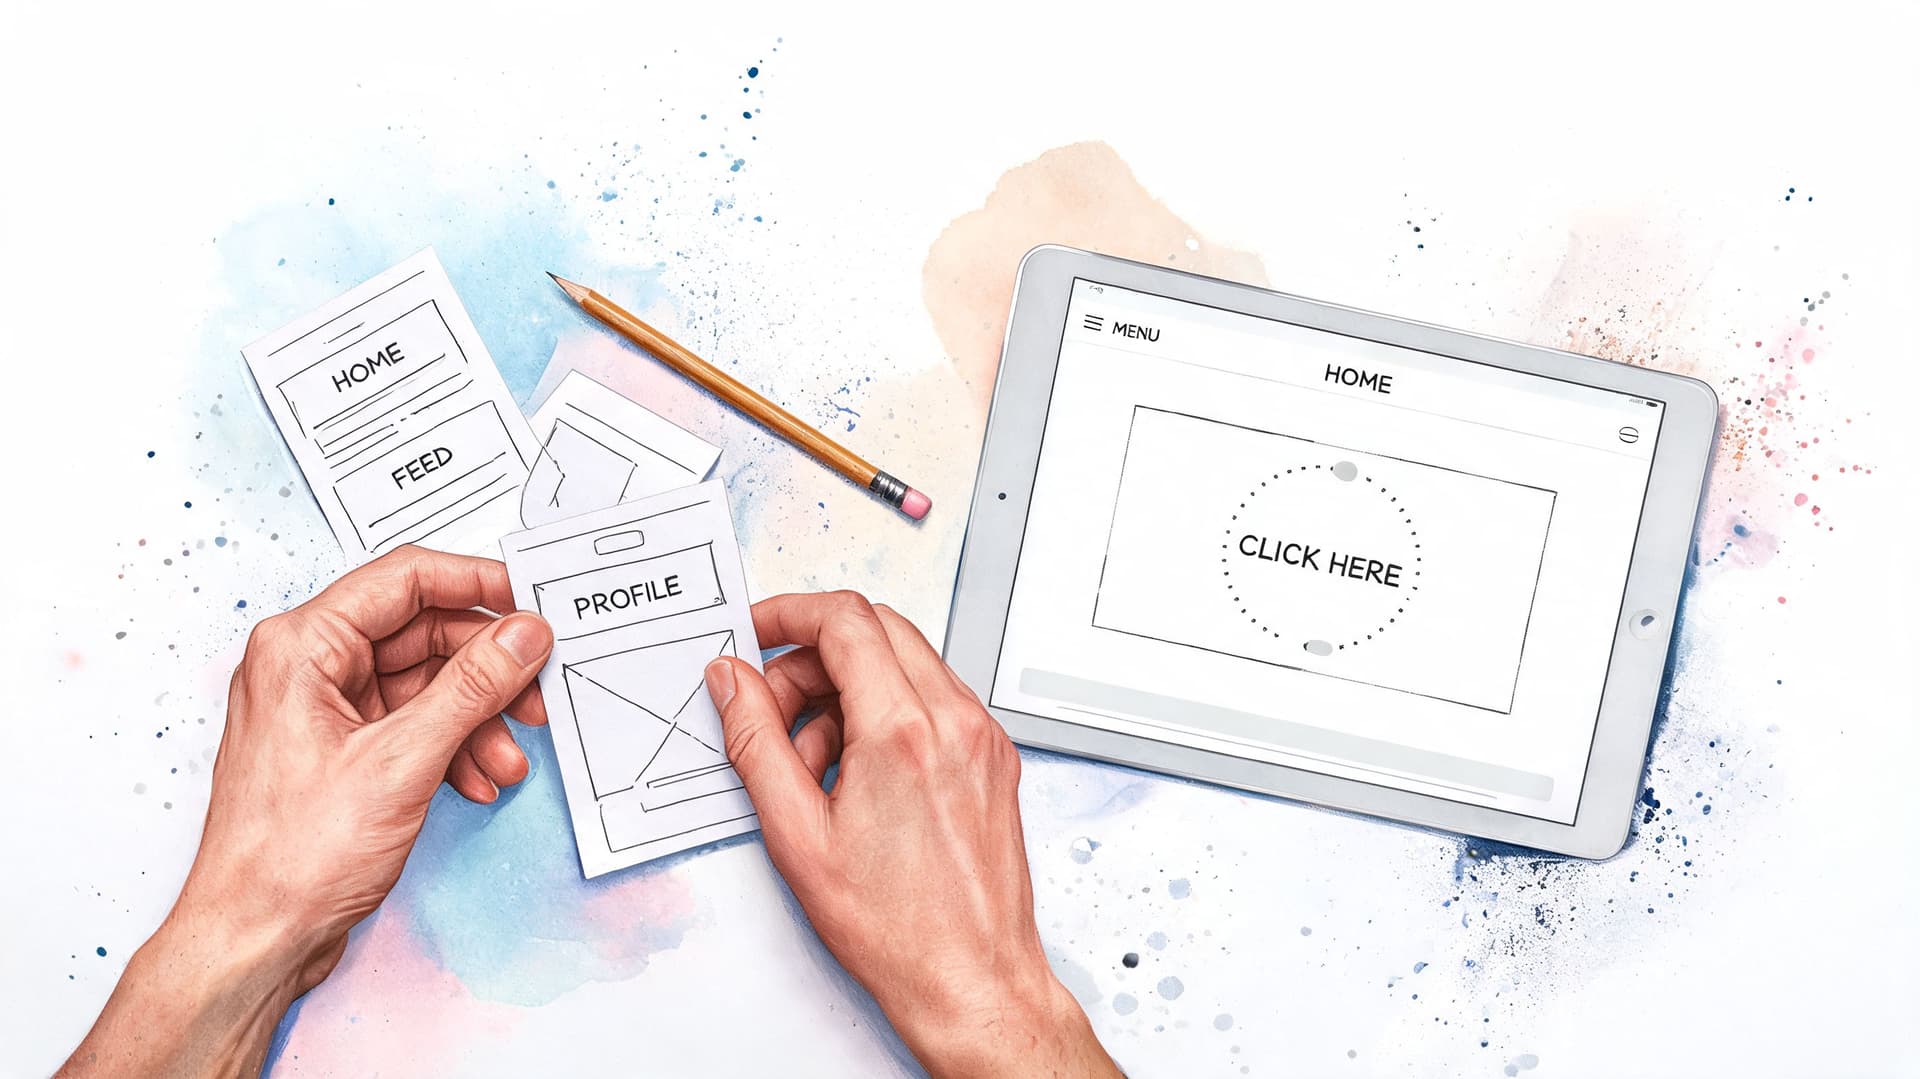
4. Prototype - Building Testable Solutions
A prototype is not a mini final product. It's a tool for answering a question.
That distinction saves teams a lot of time. If you're trying to learn whether users understand a delegation flow, you don't need production-ready visuals. If you're trying to learn whether a prioritization interaction makes sense, you may only need a clickable path through one key scenario. Teams waste weeks polishing prototypes that still don't answer the risky question underneath.
In regulated environments, the six-step design process often gets even more explicit. Arrotek's medical device framework includes six defined stages with two prototype milestones, and it reflects a gated process where each phase generates documentation and evidence before moving forward, which is one reason the model has held up across different industries in this six-step medical device design process whitepaper. The lesson applies outside healthcare too. Prototype in stages. Learn something specific at each stage.
Prototype the risk, not the whole product
A few examples of what to prototype first in a tool like Fluidwave:
- Delegation flow: Can a user understand how to pass work to an assistant without second-guessing what happens next?
- Priority logic: Does the user understand why one task appears above another?
- View switching: Do list, calendar, Kanban, table, or card views support different mental models without creating clutter?
- Task creation: Can someone capture work quickly when they're already overwhelmed?
A lean prototype can be a paper sketch, a Figma click-through, or a narrow coded interaction. Use the cheapest format that still produces credible user behavior.
If you need to show stakeholders how a concept works before building, a strong product demo can often unblock decision-making faster than another slide deck. This guide on product demos for SaaS founders is a useful companion when you're packaging prototype concepts for review.
The common failure here is building broad prototypes that try to prove everything at once. Keep each one tight. One assumption. One task flow. One decision.
5. Test - Validating with Real Users
Testing is where theory finally meets behavior. Teams often say they "validated" a design when what they did was show it to coworkers.
That doesn't count. Real testing puts the design in front of people who match the intended audience and asks them to complete realistic tasks. Modern guidance on the 6 steps of the design process consistently treats testing as the stage where user feedback determines whether assumptions survive real usage, not internal optimism.
For a product like Fluidwave, that means giving users actual work scenarios. A founder needs to sort an overloaded task list before a meeting. An executive needs to delegate something quickly without losing control. A virtual assistant needs to understand task scope and next steps. A user who struggles with executive function needs to find clarity fast, not after a tutorial.
What to watch during testing
The best signals are usually behavioral:
- Where they pause: Hesitation often points to ambiguity or distrust.
- Where they backtrack: This usually reveals information hierarchy or labeling problems.
- What they ignore: Features the team loves may not matter in the moment of use.
- When they ask for confirmation: That often signals weak system feedback.
Here is a useful reference point for what happens after testing and before adoption. Product adoption is best understood as movement through stages such as awareness, interest, evaluation, trial, activation, and adoption, and adopter segments move through those stages at different rates, which is why one-size-fits-all onboarding tends to underperform in this product adoption process guide. In practical terms, many design teams should pay special attention to the trial-to-activation transition because that's where users decide whether the product fits their workflow.
This short video is a helpful reminder that usability issues usually show up in small moments, not dramatic failures.
Watch what users try to do before you listen to what they say they want.
Testing also needs discipline after the session ends. Log findings, cluster them by severity, and distinguish between preference feedback and true usability breakdowns. Not every complaint deserves a redesign.
6. Iterate - Refining Based on Feedback
Iteration is where mature teams separate from workshop theater. If testing reveals friction and the product doesn't change, the process was performative.
This step matters because the 6 steps of the design process are not really linear in practice. Group107 describes the framework as a dynamic, cyclical methodology, and other product design guidance makes the same point in different language. Teams often need to loop back after testing, compress steps for an MVP, or revisit definition when early assumptions don't hold.
That matters even more for productivity tools, where friction compounds quickly. Existing design-process content often under-explains how the workflow should adapt for accessibility, neurodiversity, or low-distraction environments. Talent Garden's coverage highlights empathy, definition, ideation, prototyping, and testing, but a more useful design question for attention-sensitive products is often how to remove friction, reduce clutter, and lower context switching rather than merely generate more features, as discussed in this article on the six stages in the design thinking process.
Iterate with a filter
Good iteration is selective. You don't improve the product by reacting to every comment.
Use a simple filter:
- Fix blockers first: Anything that prevents task completion or creates mistrust.
- Reduce repeated friction: Small issues that show up across multiple sessions or support conversations.
- Protect the product's core: Don't add complexity just because a few users asked for more controls.
- Retest meaningful changes: If a revision changes behavior, verify it with users before treating it as solved.
For a system like Fluidwave, iteration might mean simplifying task creation, clarifying delegation states, or giving users more control over automated prioritization without turning the interface into a settings maze. That balance is hard. Product teams often overcorrect and add complexity in the name of flexibility.
One caution: Constraints are part of the design. If simplicity is a product principle, defend it during iteration.
Operationally, an actual workflow system earns its keep by organizing this phase. Turn findings into assigned tasks, give each issue an owner, and track which changes need retesting. If your team needs a shared reference, Fluidwave's explanation of what an iterative process is fits well here because it reinforces that iteration is a managed loop, not random change.
6-Step Design Process Comparison
| Phase | 🔄 Implementation Complexity | ⚡ Resource Requirements | 📊 Expected Outcomes / ⭐ Effectiveness | Ideal Use Cases | 💡 Key Advantages |
|---|---|---|---|---|---|
| 1. Empathize - Understanding User Needs | High 🔄: deep qualitative research and synthesis | High ⚡: skilled researchers, recruitment, time investment | High ⭐: authentic user insights, personas, prioritized pain points | Early discovery, complex user groups (ADHD, executives, assistants) | Reveals unmet needs; reduces assumptions; guides feature prioritization |
| 2. Define - Problem Statement & Design Brief | Medium 🔄: synthesis, alignment, clear framing | Moderate ⚡: workshops, stakeholder time, documentation | High ⭐: focused problem statements and success criteria | Pre-ideation alignment, scoping, investor/stakeholder buy-in | Creates shared vision; prevents scope creep; enables objective evaluation |
| 3. Ideate - Generating Creative Solutions | Medium 🔄: facilitated divergent/convergent sessions | Moderate ⚡: cross-functional time, facilitation tools | Variable ⭐: many concepts, potential for novel combos (AI+human) | Generating solution alternatives, breaking assumptions | Produces diverse options; fosters creativity and hybrid solutions |
| 4. Prototype - Building Testable Solutions | Medium–High 🔄: creating testable artifacts (low→high fidelity) | Moderate–High ⚡: design tools, dev effort for interactive prototypes | High ⭐: validated interactions, early usability insights, reduced dev risk | Validating flows (delegation, auto-priority), UI choices | Identifies usability issues early; saves development time and cost |
| 5. Test - Validating with Real Users | Medium 🔄: structured testing, metrics collection | Moderate ⚡: participant recruitment, moderators, analytics | High ⭐: objective evidence (time-saved, SUS, task success rates) | Pre-launch validation, measuring impact of high-risk features | Provides measurable validation; informs prioritized fixes and adoption |
| 6. Iterate - Refining Based on Feedback | Ongoing 🔄: repeated cycles of change and evaluation | Sustained ⚡: engineering, analytics, continuous user feedback | High ⭐ (compounded): incremental improvements and higher retention | Post-launch refinement, scaling to new user segments | Compounds improvements; maintains relevance; builds user trust |
Your Design Process is Your Product's Foundation
The 6 steps of the design process work because they force teams to move from assumption to evidence. Empathize gives you reality. Define gives you focus. Ideate opens the option space. Prototype makes ideas concrete. Test exposes what holds up. Iterate turns feedback into a better product.
In real work, those steps rarely unfold in a neat straight line. A prototype can send you back to definition. Testing can expose gaps in empathy research. A rushed MVP may compress ideation and prototyping into the same week. That's normal. The mistake isn't looping back. The mistake is pretending the team learned nothing and pushing forward anyway.
The strongest teams treat the process as both a design system and an operating system. They assign the research, document decisions, track unresolved questions, and make sure each stage produces something the next stage can use. That's where design process breaks down most often. Not in theory, but in execution. Notes get lost. Ownership gets fuzzy. Stakeholder feedback arrives without context. Engineers inherit decisions that were never written down.
This is also why workflow support matters more than most design articles admit. A platform like Fluidwave can help teams turn discovery, synthesis, prototyping, and iteration into visible work with owners and deadlines. That doesn't replace judgment. It supports it. For design leads, product managers, and founders, that kind of operational clarity is often the difference between a disciplined process and a pile of good intentions.
If you're trying to improve how your team works, don't obsess over following the six steps perfectly. Use them to create better decisions at the right time. That's what keeps products grounded, testable, and more likely to earn adoption once they reach real users.
If you want a practical way to manage design work as it moves from research to iteration, Fluidwave is one option to consider. It can help you organize tasks, assign owners, support delegation, and keep the design process moving without losing decisions between steps.
Focus on What Matters.
Experience lightning-fast task management with AI-powered workflows. Our automation helps busy professionals save 4+ hours weekly.